How to Use
Before starting to use, you will have to install Obsidianki’s template, without which Obsidianki would not work. To do so, go to Anki’s Add-ons folder, open the folder “Obsidianki 4”, and find Obsidianki 4.apkg. Double click on it to install. You can also download it from GitHub.
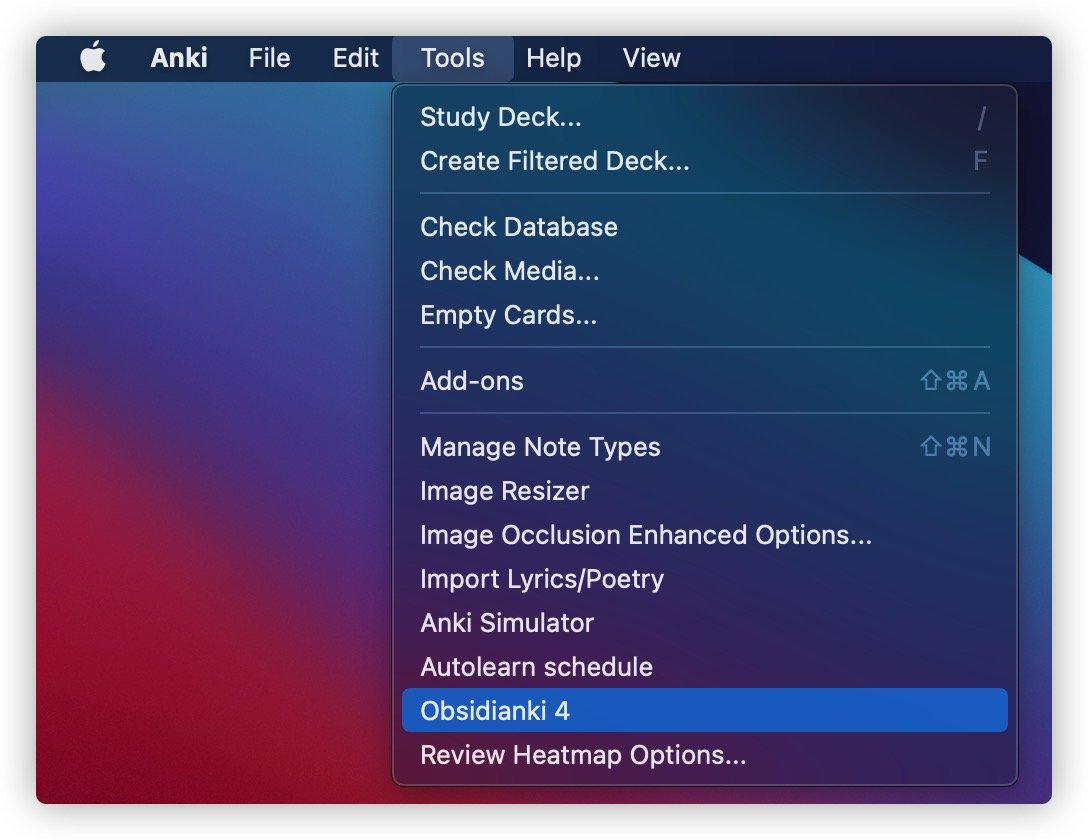
After you’ve installed the Add-on, you can open Anki, select Tools -> Obsidianki 4, as shown in the following picture.
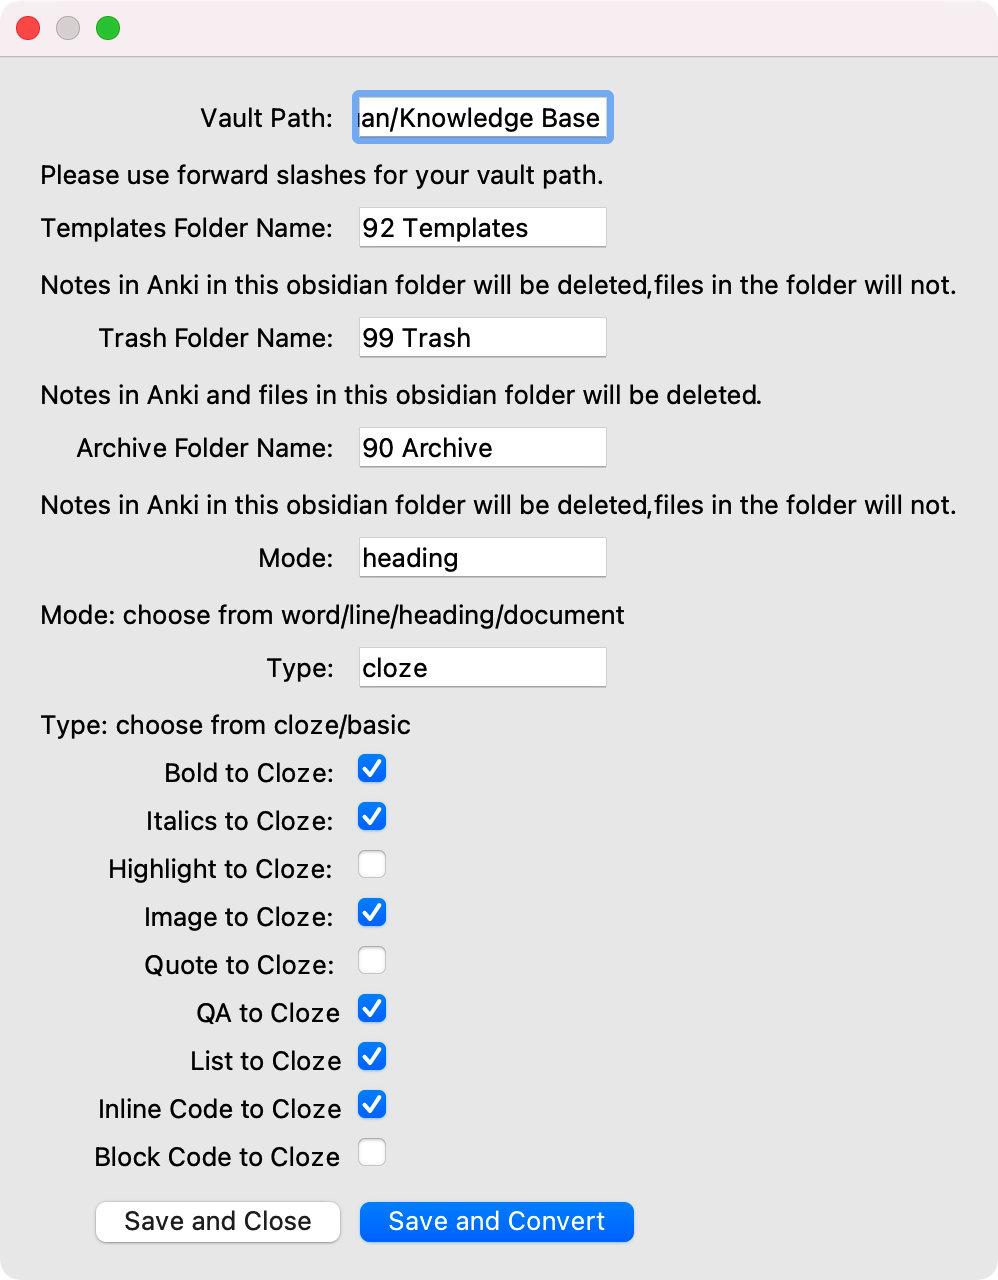
The following menu will pop-up, which will include the default preferences panel. NOTE THAT THE SETTINGS IN THIS PANEL ARE ALL DEFAULT SETTINGS, and you SHOULD NOT change them regularly, as a change will AFFECT ALL YOUR NOTES.
Copy the path of your Obsidian vault into the first field. Note that you will have to use forward slashes / instead of backward ones for Obsidianki to function properly.
After you’ve set the settings (I will explain in the next section), you can click on “Save and Convert”, and it will complete the conversion. However, you won’t notice a difference. Why? Because Anki’s interface is not refreshed. To refresh the interface, you could click on anything in Anki’s main interface, and it should be refreshed.
Default Settings
Now, let’s take a look at the default settings.
Vault Path
This place shows the path to your vault. Note that in order for the wiki-links in Anki to link back to Obsidian, you will have to use a path that is actually a vault. If you just copy the path of a folder in the vault, the link function will not work.
Another thing to take especial note of is that you should use forward slashes instead of backward ones.
Templates Folder Name
The name of the folder in the first level that holds your templates. If specified, the contents in this folder would not be imported to Anki.
Trash Folder Name
The name of the folder in the first level that holds your trash. If specified, the contents in this folder would be erased when you run the Obsidianki add-on, and the corresponding cards in anki would also be deleted.
Archive Folder Name
The name of the folder in the first level that holds your archived file. If specified, corresponding anki cards to the contents in this folder would be deleted in Anki, but the files are still there in Obsidian and would not be deleted.
Mode
There are four importing cloze modes in Obsidianki.
word mode
It generates a card for every cloze. If you have 10 clozes, it generates 10 cards from {{c1::Card 1}} to {{c10::}}.
line mode
It generates a card for every line. If you have 10 clozes in the first line, they will be {{c1::Card 1}} to {{c10::Card 10}}. If you have 2 more clozes in the second line, they will be {{c2::Card 11}} to {{c2::Card 12}}.
heading mode (Recommended)
It generates a card for the content under every heading, with the exception of list cards and QA cards (I will explain this below). If you have a file as below:
# Heading 1

Hello **Obsidianki**.

This is the best **Anki** add-on for importing Obsidian files into **Anki**.

## Heading 2

This is something **interesting**.

Q: What is the best add-on for importing Obsidian files into **Anki**?

A: Obsidianki!

What are the features of Obsidianki?

1. Import files
2. Preserve wiki links
3. Convert to Clozes

## Heading 3

This is **Heading 3**.
The “Obsidianki”, “Anki” under “Heading 1” will be turned into {{c1::Obsidianki}} and {{c1::Anki}} respectively.
Theoretically, everything under “Heading 2” should be turned into {{c2::...}} cards, right? Not quite, because I have added QA cards and list cards. So, after conversion, the portion under heading to would become:
## Heading 2

This is something **{{c2::interesting}}**.

Q: What is the best add-on for importing Obsidian files into **Anki**?

A: {{c3::Obsidianki!}}

What are the features of Obsidianki?

1. {{c4::Import files}}
2. {{c5::Preserve wiki links}}
3. {{c6::Convert to Clozes}}
document mode
In the document mode, everything will be converted to {{c1::...}}.
Type
There are two types in Obsidianki 4: cloze and basic. Nevertheless, these two types are different from Anki’s cloze and basic.
cloze
This type will create visible deletions on the screen. You will be able to see [...] on the screen where you applied cloze.
basic
This type will only create one card, and the cloze deletion would not be visible.
Conversions
Bold to Cloze:
This converts the bold syntax **bold** to cloze in Anki, while preserving the format.
Italics to Cloze:
This converts the italics syntax *italics* to cloze in Anki, while preserving the format.
Highlight to Cloze:
This converts the highlight syntax ==highlight== to cloze in Anki, while preserving the format.
Image to Cloze:
This converts the image syntax ![]() to cloze in Anki, while preserving the image.
Quote to Cloze:
This converts the quote syntax > this is a quote to cloze in Anki, while preserving format.
Be aware that currently, this has conflicts with the other syntaxes. If you want to leave this option on, you will have to make sure that you apply no other cloze formatting in the quote.
QA to Cloze:
This converts the QA syntax that I created into cloze in Anki.
Q: Question

A: Answer
Q: Question

A: {{c1::Answer}}
List to Cloze:
This turns any list into Cloze, where each list item is a cloze.
Inline Code to Cloze:
This converts the inline code syntax to cloze in Anki, while preserving format.
Block Code to Cloze:
This converts the block code syntax to cloze in Anki, while preserving format.
Individual Settings
You can also individually specify the settings for each note (file) in the metadata section of your file. The metadata section is the following segment in the very beginning of a document.
---
uid: 4511487055494033182
---
By the way, Obsidianki will automatically create a metadata section that contains the file’s unique id in the file. If you don’t want duplicated notes, do not change the uid.
If you want to change the individual importing settings for each file, type it in in the metadata section. You can make this a template in Obsidian:
---
mode: heading
type: cloze
bold: True
italics: True
highlight: False
image: True
quote: False
QA: True
list: True
inline code: True
block code: False
---