In another thread I announced that I’ll create a guide on how to include external JavaScript libraries in a note template. I will use Tippy.js as an example, since it covers both the JavaScript and the CSS part.
Update 01.08.21: The sample script has been updated to the format used by the Tippy Tooltips add-on.
Disclaimer: JavaScript is not officially supported by Anki. Therefore, if you run into trouble, there are no official documents to help you out. Things might break in the future and if you don’t understand the code you’re using, you’re at the mercy of other people to fix things. I’ll try to maintain this post for some time, but I can’t promise anything. If you encounter any issues, please let me know in the comments.

Tippy Tooltips sample
You can download a working sample note type here: https://ankiweb.net/shared/info/1782812971
How to include external libraries
Anki cards are like websites in many ways. A common way to use external libraries on the web is to link to their their content delivery network (e.g. https://unpkg.com):

But our cards should be usable without an internet connection too. That’s why we want to store our external libraries inside the collection.media folder.
🛈
collection.mediais synced between all clients (Anki Desktop, AnkiMobile etc.), so we only need to do this once.
We should also strive for cross-platform compatibility, so we can share our deck knowing that other users can enjoy it as well. Keeping these considerations in mind, I will show you an approach that works on all Anki clients - offline.
Download the necessary files
Every good JavaScript library has setup instructions somewhere on its landing page. As we can see on the “Getting Started” page of Tippy, the following files are required:
Optional:
tippy.css(unpkg)
🛈 Always download the minified version (
.min) - if available - to save space.

When presented with a raw text page like the ones from UNPKG, hit Ctrl+S to save the file to your computer.
Rename and move to media folder:
After we finished downloading the code, it’s time to move our files to collection.media.
Attention: Because the files aren’t referenced directly in our fields, Anki will count them as unused when we click on Check Media:

To prevent this, we must prepend the filenames with an underscore:

Import JavaScript files
I once explained on the AnkiDroid repo how to import external files into an Anki template.
Now we got a special challenge: Popper needs to be loaded before Tippy, because Tippy depends on Popper. The following script is an improved version of the one on GitHub. It allows us to import a hierarchical structure of dependent libraries.
Cross-platform script loader
var files = [{
    name: "Popper",
    url: "_popper.min.js",
    dependent: {
        name: "Tippy",
        url: "_tippy.umd.min.js",
        init: initTooltips
    }
}]

function getAnkiPrefix() {
    return globalThis.ankiPlatform === "desktop" ?
        "" :
        globalThis.AnkiDroidJS ?
        "https://appassets.androidplatform.net" :
        "."
}

if (!globalThis.ExternalScriptsLoaded) {
    var promises = []
    for (file of files) {
        promises.push(loadScript(file))
    }
    Promise.all(promises).then(() => {
        globalThis.ExternalScriptsLoaded = true
    })
}

async function loadScript(file) {
    var scriptPromise = import (`${getAnkiPrefix()}/${file.url}`)
    scriptPromise.then(() => {
            console.log(`Loaded ${file.name}.`)
            if (file.init) file.init()
            if (file.dependent) loadScript(file.dependent)
        },
        (error) => console.log(`An error occured while loading ${file.name}:`, error)
    )
    return scriptPromise
}
🛈 You can use this script as a template for your own JavaScript libraries. Simply exchange/extend the contents of
files.
As you can see, the files can have a property called init. This can be any function we want to execute right after the library has been loaded:
...
    {
        name: "Tippy",
        url: "_tippy.umd.min.js",
        init: helloTippy // <- executed after Tippy has loaded
    }
...
function helloTippy() {console.log("Hello, Tippy!")}

🛈 The Tippy
fileis nested into the Popperfileasdependent. Analogous toinitfor functions, the dependentfile(Tippy) will start loading once the dependency (Popper) has finished loading.
var files = [{
    name: "Popper",                  // <- dependency for Tippy
    url: "_popper.min.js",
    dependent: {
        name: "Tippy",               // <- this file will load
        url: "_tippy.umd.min.js",    // once the dependency (Popper)
        init: initTooltips           // has finished loading
    }
}]
Use imported library
Now that we have told Anki how to import our library, we can use it in our own template code.
Updated (01.08.21): This works in conjunction with the Tippy Tooltips add-on.
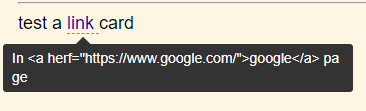
Here is a simple script that converts elements with a data-tippy-content attribute to working tooltips (CSS provided in sample note type):
Tooltip script - Updated for Tippy Tooltips add-on
function initTooltips() {
    globalThis.tippyAvailable = true
    createTooltips()
}

if (globalThis.tippyAvailable) setTimeout(() => {createTooltips()}, 0)

function createTooltips() {
    tippy("[data-tippy-content]", {
        placement: "top",
        allowHTML: true,
        theme: "sample",
        interactive: true,
        trigger: "mouseenter click",
        animation: "scale-extreme",
        appendTo: document.body,
    })
}
🛈 Notice the function
initTooltips(), which was called by our import script above? It sets the global variabletippyAvailable = true, allowing the execution ofcreateTooltips()on further cards.
Input

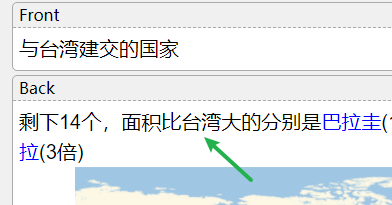
Output
Import CSS files
Because of the non-dynamic nature of CSS, the process of importing external stylesheets is much simpler.
For example, we want to include the following two CSS files for our tooltips:
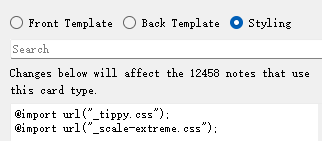
All we need to do is to put the following lines on top of the Styling section of our template:
@import url("_tippy.css");
@import url("_scale-extreme.css");

This was a pretty long post. Thanks for bearing with me - I hope you could get something out of it! I’d like to give special thanks to @hengiesel for his help in getting me where I am in terms of Anki-specific JavaScript. He’s been a major source of inspiration for a lot of my work.


 )
)